Saturday, November 27, 2010

Purple Crush!


A few months ago I was introduced to an incredibly cool and ridiculously creative lady who inspires me daily...and I really mean every day. Kristy, aka the Purple Pug, is currently conducting what she calls "an experiment in nice" on her blog. For 365 days she is profiling someone she thinks you should know - a "crush" in Pug vernacular. It was my great honor to be selected as crush #40 this week - can life get any better than that? Please check out the amazingly sweet shout out here.

But more importantly, please take some time to learn more about the Purple Pug - leave lots of time though because she has tons of amazing products to peruse. Here is her site...enjoy!


Friday, November 26, 2010

Shopping for a Great Cause...

Happy Black Friday - I hope you all got some fantastic deals like I did at 5am this morning. Yes, I'm one of those people who actually looks forward to running through stores in the wee hours of the morning in search of a sale or two.

Speaking of sales, there is a great 2-for-1 deal going on today over at the Children's Party Network for the East Coast/West Coast Tablescape challenge. It is my great pleasure to be playing for the East, but regardless of which team takes the challenge the real winner will be Project Night Night - you can learn more about the challenge and the charity here.


So, today only, you can purchase 1 ticket and have 2 entries in the raffle. The goal is to sell 100 tickets by December 6th. If you are interested in purchasing a ticket (or lots and lots of tickets), please go here.


Wednesday, November 24, 2010

Thanksgiving by Candlelight

Here are some last minute ideas for easy-to-make candles that can dress up your Thanksgiving table. I created 3 different designs using materials that I had laying around the house.

Design #1
A simple candle holder made out of an empty soup can and ribbon.


Just remove the soup label, wrap the ribbon around the can and you're done.


Design #2
Take 3 pears and attach them together using toothpicks in a triangle shape. Then drop a long taper in the middle - that's it.


Design #3

This last design requires the use of a Cricut machine - my new favorite toy. Load 3 separate strips of ribbon into the machine and cut the words "happy" "thanks" "giving" out. Then attach the ribbon around the candles - done.


Happy Thanksgiving - I hope you have a fabulous holiday!


Tuesday, November 16, 2010

DIY Thanksgiving Centerpiece

Okay, I have to admit that I'm in denial that Thanksgiving is happening next week. We're still working our way through Halloween candy at my house, so it's hard to move on to the next holiday so quickly!

Speaking of Halloween, the ridiculously talented people over at Martha Stewart created a great bat candy jar craft that serves as the inspiration for this post.

Here's a really simple centerpiece that you can make for Thanksgiving...


Here are the instructions from Martha's tutorial that I followed to construct this centerpiece (the steps I added are indicated with an asterisk):

Tools and Materials

White or cream card stock
*Pilgrim Hat template
Scissors
Xyron Creative Station with permanent adhesive cartridge (*if you don't own a Xyron, try using double-sided adhesive sheets)
Black beans
White beans
*Corn
*Large vase
*Empty plastic container to hold flowers
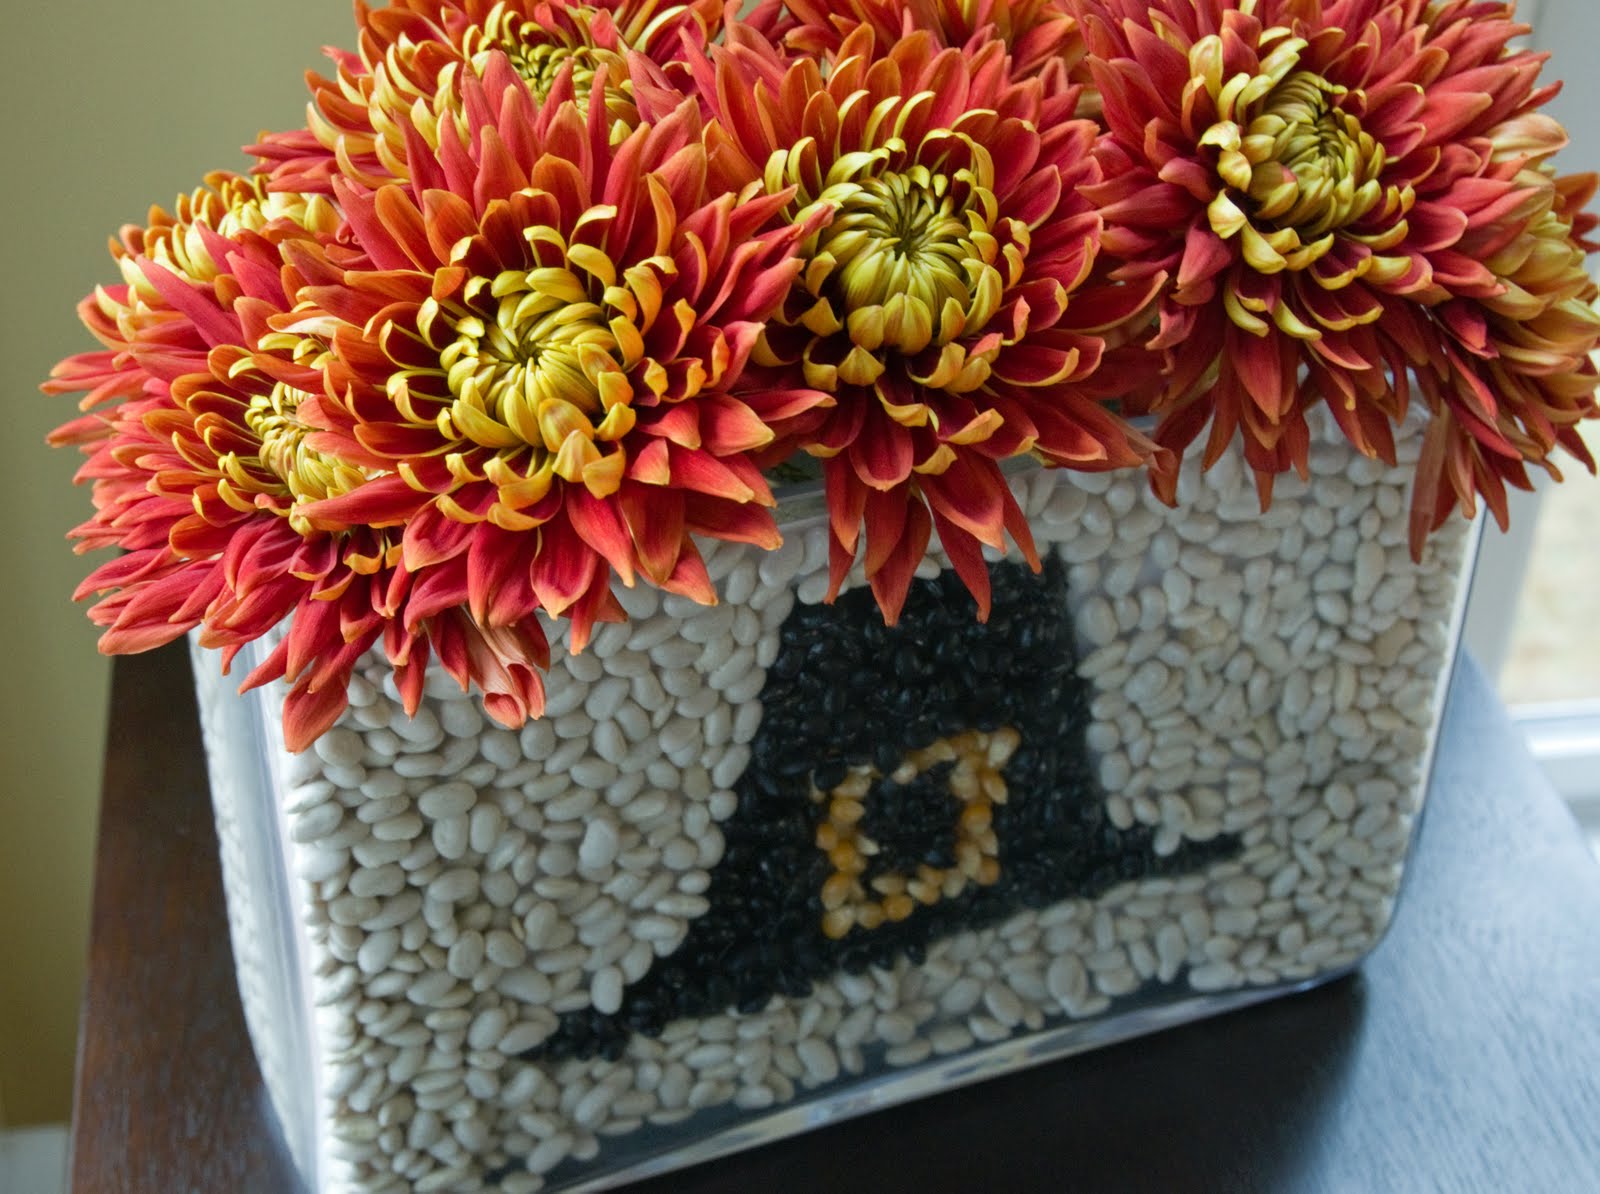
How-To
1. Print the pilgrim hat template on card stock. Trim card stock to a size to fit the vase, and run through Xyron so the front of the template is covered in adhesive. Here's the template I used:


2. Peel paper to expose adhesive. Cover the black area with black beans,the yellow area with corn and the white area with white beans.

3. When the sheet is fully covered, slide it into the vase. Press against glass.

4. Insert the empty plastic container into the vase behind the sheet. Then fill it with flowers.

5. Finally, fill jar with white beans.


So from this...


...to this.


To quote Martha, it's a good thing!


Thursday, November 11, 2010

Craft Wars - The Saga Begins

I recently hooked up with a fantastic group of party people over at the Children's Party Network. In additional to all of the great party info, the network recently became even more fun with the addition of Craft Wars - a crafting challenge!


The inaugural challenge for Craft Wars is to create a child's party-related item using a cereal box as craft material. My first reaction was to take a pass on this one, but I love a good challenge!

A few years ago I saw an article in Parents magazine about constructing a carousel cake topper using popsicle sticks. So I decided to tweak that idea for this challenge. I used parts of cereal boxes to form the tent and the carousel horses. Here's the result...


And then my son insisted that I include a nice glass of milk to go with the cake...


Thanks to the folks over at CPN for coming up with such a clever contest. I can't wait for the next challenge!

Sunday, November 7, 2010

Last Minute Thanksgiving Place Cards

No matter how much planning goes into Thanksgiving, I always manage to forget something until the very last minute that threatens to derail the entire meal. Last year it was place cards. Okay, maybe I'm being a little dramatic about the derailment part, but the type-A person in me gets really frustrated when a great plan does not come together - especially when it's a party.

I thought it would be fun to recreate the terror I faced last Thanksgiving and try to make a cool place card in 5 minutes or less using limited supplies. Imagine the clock starting now...

The only items I have to construct the place card are black and white cardstock paper, yellow ribbon and a pair of scissors.


The first thing that came to mind was a pilgrim hat. Here are the steps to make the place card:

A. Cut and fold the white cardstock paper in half to make a tent. Then cut 2 parallel slits vertically and 1 long horizontal slit across the bottom.

B. Cut out a small rectangle using the black cardstock paper and slightly bend it into a "U" shape. Insert each end of the "U" into the parallel slits in the white paper.

C. Cut out a circle using the black cardstock paper - the diameter of the circle should match the length of the long slit that was made in the white paper (this does not need to be exact - just eyeball it). Trim one side of the circle and then insert it into the long slit in the white paper. This is the brim of the hat.

D. Cut out a small square from the yellow ribbon. Then cut a smaller square inside that piece to make the "buckle". Set the ribbon against the side of the U-shaped black paper.

E. Cut out a small semi-circle using the black cardstock paper and place it on top of the U-shaped paper. This will be the top of the hat.

Here's the result...


No adhesives required and it took less than 5 minutes to construct. Hope this post helps you avoid place card drama this Thanksgiving!


Blog Template by YummyLolly.com